Facebook
Google Plus
Linked in
This article is for informational purposes only and no longer being updated by Seagate.
Connecting the LaCie d2 Bigger Disk
Connecting the Power Supply
Note: Only use the AC adapter supplied with your specific LaCie drive. Do not use a power supply from another LaCie drive or another manufacturer. Using any other power cable or power supply may cause damage to the device and void your warranty.
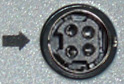
The power supply consists of an AC Power Adapter and a power cord.
- Connect the power cord to the AC Power Adapter and plug into a wall outlet.
- Connect the other end to the power plug on the drive. The plug is keyed so the flat side of the power cord faces the arrow.
- Verify that the green LED on the AC Power Adapter is lit. If not, verify the connection of the power cord to the adapter.
|  |
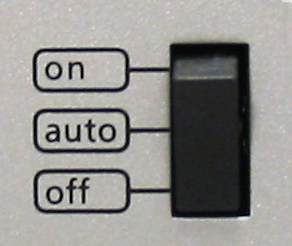
On/Off/Auto Power Switch
Auto Position
Works with FireWire 400, 800 and USB connections.
- Allows the drive to power on and off automatically with the computer.
- Also allows the drive to manage power consumption. If the systems power save feature supports it, the drive will spin down during the power save mode. After the system comes out of power save, the drive will take a few seconds to spin up to full power before it can be accessed.
On Position
Set to the ON position if you do not want the drive to power on and off automatically with the computer. Manually powers the drive on.
- The drive will stay on unless the switch is moved to the OFF position.
- Allows quick access to the data because the drive does not go into power save mode.
Off Position
Manually powers the drive off.
- Keeps the drive from powering on automatically.
- The drive will stay off unless the switch is moved to the ON position.
|  |
| The blue LED shows that the drive is powered on and blinks to indicate drive activity. |  |
Connecting the Drive to the Computer
Your drive has the following ports available for connecting to your computer. Follow the instructions for the port you will use. Note: You cannot have the drives FireWire and USB interfaces connected at the same time. However, you can use both FireWire 400 and FireWire 800 at the same time. |
FireWire 400
- Both ends of the 6-pin FireWire 400 cable are identical. Plug one end into the FireWire 400 port of the drive and the other end into the FireWire 400 port of the computer. Be sure that you insert the cable with the proper orientation. Inserting it incorrectly may damage the drive or computer.
|  |
- FireWire 400 devices can be connected via a FireWire 800 port. However, they will operate at FireWire 400 speeds. This will require a 6-pin to 9-pin cable. Do not place the FireWire 400 device between the computer and any FireWire 800 devices. They must be at the end of the FireWire 800 bus.
|
- Some computers may have a 4-pin FireWire 400 port. While this port may only support connecting cameras, some do support mass storage devices. If your 4-pin port supports mass storage devices you can connect a FireWire drive. It will require a 6-pin to 4-pin cable. Refer to your computer manual if you are unsure if your 4-pin port supports mass storage devices. Note: Because a 4-pin port is non-powered, you will need to press the blue button to power on the drive.
|  |
FireWire 800
- Both ends of the 9-pin FireWire 800 cable are identical. Plug one end into the FireWire 800 port of the drive and the other end into the FireWire 800 port of the computer.
- FireWire 800 devices can be connected via a FireWire 400 port. However, they will operate at FireWire 400 speeds. This will require a 6-pin to 9-pin cable.
Note: Do not connect FireWire cables so that they form a ring of devices. There is no need for terminators on FireWire devices, so the unused FireWire connectors should be left empty. |  |
USB 2.0
- The USB cable has two types of connectors. The Type-B port plugs into the drive. The Type-A port plugs into the computer.
|  |