Was this content helpful?
How could we make this article more helpful?
Manage Security
Managing the security of your LaCie Rugged SECURE is easy using Toolkit. Enable security, create a password, and rest easy knowing your data is protected with Seagate Secure 256-bit encryption technology.
Enabling security with Toolkit
Toolkit is required to enable security for LaCie Rugged SECURE.
- Connect LaCie Rugged SECURE to your computer.
- Open Toolkit.
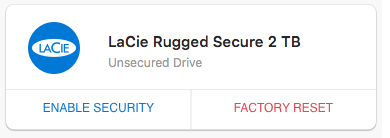
- On the Main Menu, click on the LaCie Rugged SECURE device.
- Click ENABLE SECURITY.

macOS 10.13 or later—A driver needs to be installed. At the prompt, use the Finder to eject the drive, and then disconnect the cable from the computer. Toolkit will prompt you to enable a system extension:
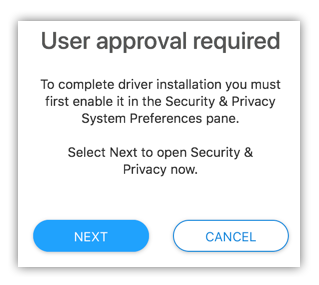
Click NEXT. Navigate to your Security & Privacy System Preferences and enable the system extension signed by “Seagate Technologies LLC”.
- A notice appears informing you that you will create a password that you must remember or keep safe, as it can’t be recovered. Click the checkbox to acknowledge the notification, and then click NEXT.
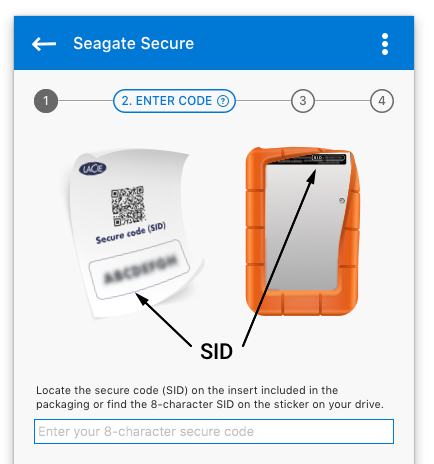
- Enter the 8-character secure code (SID) listed on the insert that was included in your LaCie Rugged SECURE packaging. (Note that the secure code is case-sensitive, meaning that it distinguishes between upper-case and lower-case letters.)
- Click NEXT.
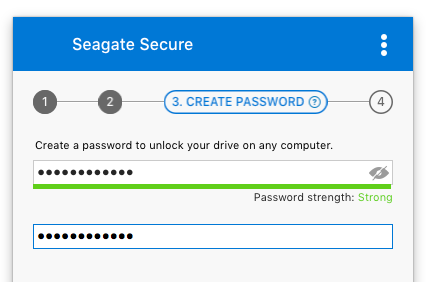
- Create a password that you will use to unlock the drive on any computer. In the upper field, enter a password that’s easy to remember but difficult to guess. Enter the same password in the lower field to confirm.
- Click NEXT.
- You’ve now secured the drive with a password. Click DONE.
Unlocking the drive
To access data on the drive, you must enter the password you created with the Toolkit app. You can enter your password using Toolkit or the Unlock Drive app located on the drive.
Entering your password with Toolkit
Each time you connect your drive to a computer installed with Toolkit, you’ll be prompted to enter your password.
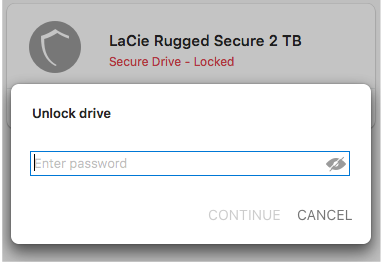
- Enter the password you created when you enabled security.
- Click CONTINUE.
If the prompt doesn’t appear automatically when you connect the drive:
- Open Toolkit.
- On the Main Menu, click on the LaCie Rugged SECURE device.
- Click UNLOCK DRIVE.
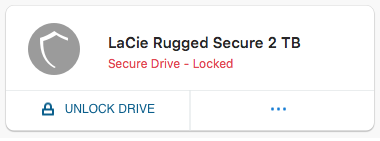
- Enter your password.
- Click CONTINUE.
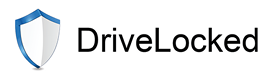
Entering your password with the Unlock Drive app
If you connect LaCie Rugged SECURE to a computer that does not have Toolkit installed, you can enter your password using the Unlock Drive app located on the drive.
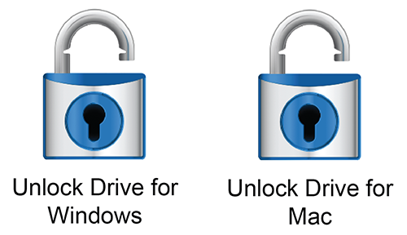
- Using a file manager such as File Explorer or Finder, open the DriveLocked volume.
- Click on Unlock Drive for Windows or Unlock Drive for Mac.
macOS 10.13 or later—A driver needs to be installed. At the prompt, use the Finder to eject the drive, and then disconnect the cable from the computer. Toolkit will prompt you to enable a system extension: Click NEXT. Navigate to your Security & Privacy System Preferences and enable the system extension signed by “Seagate Technologies LLC”.
- Enter the password you created for the drive.
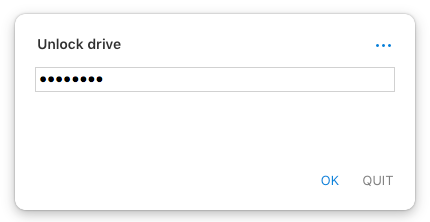
- Click OK.
Locking the drive
The drive is locked automatically whenever LaCie Rugged SECURE is ejected or disconnected from your computer. You must enter your password again when you reconnect the drive.
You can also manually lock the drive while it’s connected to a computer.
- Open Toolkit.
- On the Main Menu, click on the LaCie Rugged SECURE device.
- Click LOCK DRIVE.
- Enter your password and click CONTINUE.
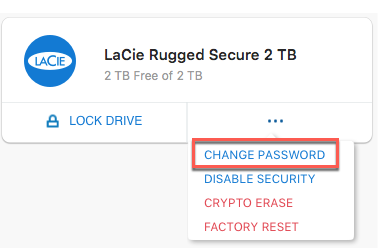
Changing your password
- Open Toolkit.
- On the Main Menu, click on the LaCie Rugged SECURE device.
- Click on the More menu icon and then click CHANGE PASSWORD.
- A notice appears informing you that you will create a password that cannot be recovered. Click NEXT.
- In the upper field, enter your current password.
- Enter your new password in the middle field, and then enter the same new password in the lower field to confirm. Click NEXT.
- You’ve now secured the drive with a new password. Click DONE.
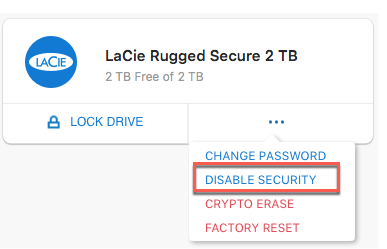
Disabling security
You can disable security so that a password is no longer needed to unlock LaCie Rugged SECURE. It will function as an unsecured drive with no password protection. You can always re-enable security again at a later date using the password you created.
- Open Toolkit.
- On the Main Menu, click on the LaCie Rugged SECURE device.
- Click on the More menu icon and then click DISABLE SECURITY.
- A notification appears informing you that you will disable security. Enter your password to confirm, and then click CONTINUE.
Re-enabling security
If you disabled security at some point, you can re-enable it using the password you created.
- Open Toolkit.
- On the Main Menu, click ENABLE SECURITY.

- Enter the password you created when you first enabled security.
Remember, the password you created is case-sensitive, meaning that it distinguishes between upper-case and lower-case letters.
- Click CONTINUE.
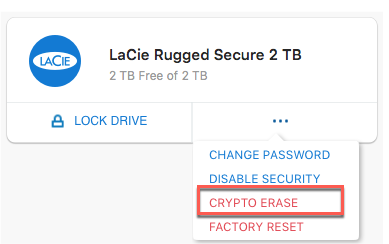
Crypto-erasing the drive
A crypto-erase securely deletes all data on the drive—it can never be recovered—while keeping your security settings in place. Your password remains the same.
- Open Toolkit.
- On the Main Menu, click on the LaCie Rugged SECURE device.
- Click on the More menu icon and then click CRYPTO ERASE.
- A notification appears informing you that you will erase all the data on the drive but maintain your security settings. Click ERASE.
- A dialog box appears. Enter your password to confirm, and then click CONTINUE.

Your system prompts you to allow Toolkit to make this change. Enter the system password for your computer to confirm the crypto-erase. 
If you are logged in to your computer as an admin user, confirm that you want to allow Toolkit to make this change. If you are logged in as a standard user, enter the system password for your computer to confirm the crypto—erase.
Resetting the drive to factory settings
A factory reset deletes all data on the drive and removes all security settings, including your password. The drive reverts to its original factory settings.
- Open Toolkit.
- On the Main Menu, click on the LaCie Rugged SECURE device.
- Click on the More menu icon and then click FACTORY RESET.
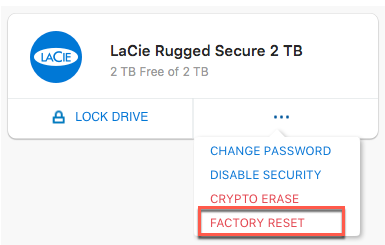
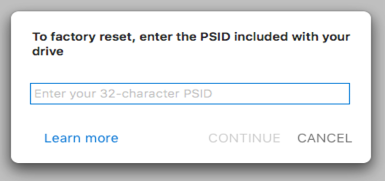
- A notification appears informing you that you will erase all the data on the drive and remove your security settings. Click RESET.
- You’re prompted to enter your PSID. This is the 32-character reset code listed on the insert that was included in your LaCie Rugged SECURE packaging. Enter the 32-character PSID. (Toolkit will automatically change lower-case letters to upper-case.)
If you no longer have the insert, you can find the PSID on a sticker located under the protective bumper encasing the hard drive. 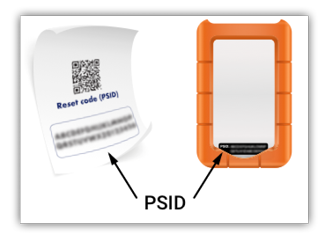
- Click CONTINUE.
Your system prompts you to allow Toolkit to make this change. Enter the system password for your computer to confirm the crypto-erase. If you are logged in to your computer as an admin user, confirm that you want to allow Toolkit to make this change. If you are logged in as a standard user, enter the system password for your computer to confirm the crypto—erase.