Was this content helpful?
How could we make this article more helpful?
System Overview
Specifications
Enclosure dimensions
| Side | Dimensions (mm) |
|---|---|
| Width | 118 |
| Height | 88.5 |
| Length | 217 |
Enclosure weight
| Capacity | Weight (kg) |
|---|---|
| 4TB | 2.4 |
| 8TB | 2.8 |
| 16TB | 2.9 |
Electrical
| Power supply |
|---|
| 36W (12V-3A) |
Use only the power supply provided with your LaCie 2big RAID. Power supplies from third-party devices and other LaCie products can damage your 2big RAID.
Environmental
| Condition | Minimum value | Maximum value |
|---|---|---|
| Temperature (still air) | +5º C | +40º C |
| Humidity | 20% | 80% |
Views
Front
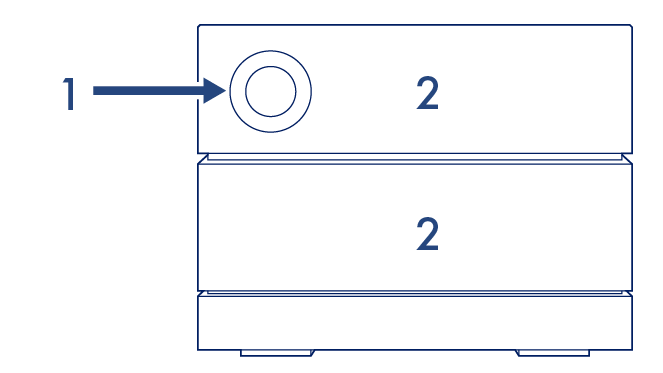
- Status LED—The LED indicates that the device is powered on and provides status signals. See Status LEDs.
- Swappable hard drive trays—Hard drive trays can be removed to replace failed hard drives. The LaCie 2big RAID hard drives are hot-swappable. See Hard Drive Maintenance.
Back
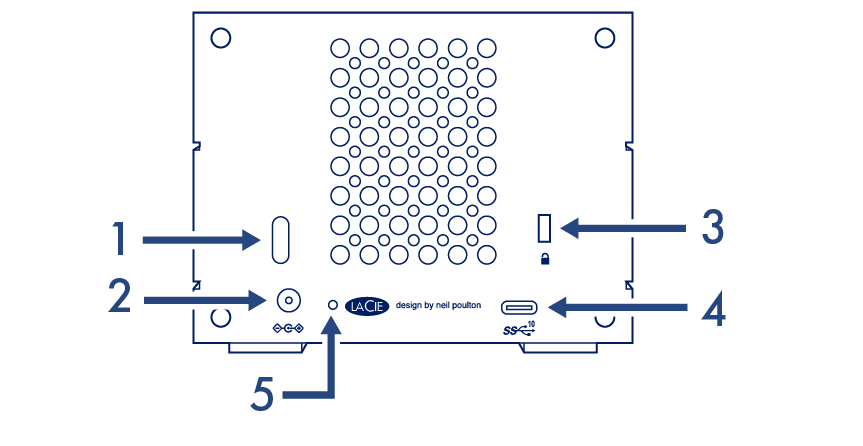
- Power button—Use this button to power the device off and on. The button is also used confirm key actions during RAID configuration. See Operation.
- Power input—Use this port to connect the power cable. Only use the power cable included with your LaCie 2big RAID. Attaching third-party or other LaCie power cables with incorrect voltage can damage the device. SeeOperation.
- Kensington™ lock port—Use this port to physically lock the 2big RAID to a desk or rack.
- USB 3.1 (Gen 2) port—Use the included USB cable to connect 2big RAID’s USB 3.1 port to your computer’s USB-C or Thunderbolt 3 port. Alternatively, you can use the included USB-C to USB-A (USB 3.0/USB 2.0) cable. Transfer rates vary by the connection type. See Cables and Connectors.
- Firmware update button—From time to time, LaCie may release firmware updates that address compatibility issues and enhance 2big RAID. Both Toolkit and LaCie RAID Manager may alert you to new available firmware updates; firmware updates are also posted to your product support page. When following the firmware update instructions, you will be prompted to use a thin, rigid wire (such as the end of a paperclip) to push the button within the recessed space. Only press this button when following instructions to update the USB firmware.